Getting started with Ruby on Rails and Bonsai Elasticsearch is fast and easy with Searchkick. In this guide, we will start with a very basic Ruby on Rails application and add the bare minimum amount of code needed to support basic search with Elasticsearch. Users looking for more details and advanced usage should consult the resources at the end of this page.
Throughout this guide, you will see some code examples. These code examples are drawn from a very simple Ruby on Rails application, and are designed to offer some real-world, working code that new users will find useful. The complete demo app can be found in this GitHub repo.
<div class="callout-warning">
<h3>Warning</h3>
<p>SearchKick uses the official Elasticsearch Ruby client, which is not supported on Bonsai after version 7.13. This is due to a change introduced in the 7.14 release of the gem. This change prevents the Ruby client from communicating with open-sourced versions of Elasticsearch 7.x, as well as any version of OpenSearch. The table below indicates compatibility:</p>
<table>
<thead>
<tr><th>Engine</th><th>Version Highest Compatible Gem Version</th></tr>
</thead>
<tbody>
<tr><td>Elasticsearch 5.x</td><td>7.13</td></tr>
<tr><td>Elasticsearch 6.x</td><td>7.14+ (sic)</td></tr>
<tr><td>Elasticsearch 7.x</td><td>7.13</td></tr>
<tr><td>OpenSearch 1.x</td><td>7.13</td></tr>
</tbody>
</table>
<p>If you are receiving a <span class="inline-code warning">Elasticsearch::UnsupportedProductError</span>, then you'll need to ensure you're using a supported version of the Elasticsearch Ruby client.</p>
</div>
<div class="callout-note">
<h3>Note</h3>
<p>In this example, we are going to connect to Elasticsearch using the Searchkick gem. There are also the official Elasticsearch gems for Rails, which are covered in another set of documentation.</p>
</div>
Make sure that there is a Bonsai Elasticsearch cluster ready for your app to interact with. This needs to be set up first so you know which version of the gems you need to install; Bonsai supports a large number of Elasticsearch versions, and the gems need to correspond to the version of Elasticsearch you’re running.
Bonsai clusters can be created in a few different ways, and the documentation for each path varies. If you need help creating your cluster, check out the link that pertains to your situation:
When you have successfully created your cluster, it will be given a semi-random URL called the Elasticsearch Access URL. You can find this in the Cluster Overview, in the Credentials tab:

Heroku users will also have a <span class="inline-code"><pre><code>BONSAI_URL</code></pre></span> environment variable created when Bonsai is added to the application. This variable will contain the fully-qualified URL to the cluster.
When you have a Bonsai Elasticsearch cluster, there are a few ways to check the version that it is running. These are outlined below:
The easiest is to simply get it from the Cluster Dashboard. When you view your cluster overview in Bonsai UI, you will see some details which include the version of Elasticsearch the cluster is running:

You can also use the Interactive Console. In the Cluster Dashboard, click on the Console tab. It will load a default view, which includes the version of Elasticsearch. The version of Elasticsearch is called “number” in the JSON response:
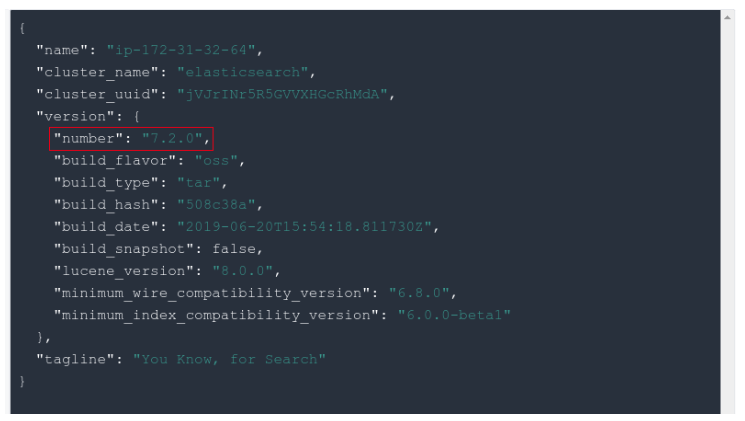
You can copy/paste your cluster URL into a browser or into a tool like <span class="inline-code"><pre><code>curl</code></pre></span>. Either way, you will get a response like so:
<div class="code-snippet-container">
<a fs-copyclip-element="click-2" href="#" class="btn w-button code-copy-button" title="Copy">
<img class="copy-image" src="https://global-uploads.webflow.com/63c81e4decde60c281417feb/6483934eeefb356710a1d2e9_icon-copy.svg" loading="lazy" alt="">
<img class="copied-image" src="https://assets-global.website-files.com/63c81e4decde60c281417feb/64839e207c2860eb9e6aa572_icon-copied.svg" loading="lazy" alt="">
</a>
<div class="code-snippet">
<pre><code fs-codehighlight-element="code" fs-copyclip-element="copy-this-2" class="hljs language-javascript">curl https://abcd123:efg456@my-cluster-123456.us-west-2.bonsaisearch.net:443
{
"name" : "ip-172-31-14-16",
"cluster_name" : "elasticsearch",
"cluster_uuid" : "jVJrINr5R5GVVXHGcRhMdA",
"version" : {
"number" : "7.2.0",
"build_flavor" : "oss",
"build_type" : "tar",
"build_hash" : "508c38a",
"build_date" : "2019-06-20T15:54:18.811730Z",
"build_snapshot" : false,
"lucene_version" : "8.0.0",
"minimum_wire_compatibility_version" : "6.8.0",
"minimum_index_compatibility_version" : "6.0.0-beta1"
},
"tagline" : "You Know, for Search"
}</code></pre>
</div>
</div>
The version of Elasticsearch is called “number” in the JSON response.
To install Searchkick, you will need the searchkick gem. Add the following to your Gemfile outside of any blocks:
<div class="code-snippet-container">
<a fs-copyclip-element="click-3" href="#" class="btn w-button code-copy-button" title="Copy">
<img class="copy-image" src="https://global-uploads.webflow.com/63c81e4decde60c281417feb/6483934eeefb356710a1d2e9_icon-copy.svg" loading="lazy" alt="">
<img class="copied-image" src="https://assets-global.website-files.com/63c81e4decde60c281417feb/64839e207c2860eb9e6aa572_icon-copied.svg" loading="lazy" alt="">
</a>
<div class="code-snippet">
<pre><code fs-codehighlight-element="code" fs-copyclip-element="copy-this-3" class="hljs language-javascript">gem 'searchkick'
</code></pre>
</div>
</div>
This will install the gem for the latest major version of Elasticsearch. If you have an older version of Elasticsearch, then you should follow this table:
<table>
<thead>
<tr><th>Elasticsearch Version</th><th>Searchkick Version</th></tr>
</thead>
<tbody>
<tr><td>1.x</td><td>-> 1.5.1</td></tr>
<tr><td>2.x</td><td>-> 2.5.0</td></tr>
<tr><td>5.x</td><td>-> 3.1.3 (additional notes)</td></tr>
<tr><td>6.x and up</td><td>-> 4.0 and up</td></tr>
</tbody>
</table>
If you need a specific version of Searchkick to accommodate your Elasticsearch cluster, you can specify it in your Gemfile like so:
<div class="code-snippet-container">
<a fs-copyclip-element="click-4" href="#" class="btn w-button code-copy-button" title="Copy">
<img class="copy-image" src="https://global-uploads.webflow.com/63c81e4decde60c281417feb/6483934eeefb356710a1d2e9_icon-copy.svg" loading="lazy" alt="">
<img class="copied-image" src="https://assets-global.website-files.com/63c81e4decde60c281417feb/64839e207c2860eb9e6aa572_icon-copied.svg" loading="lazy" alt="">
</a>
<div class="code-snippet">
<pre><code fs-codehighlight-element="code" fs-copyclip-element="copy-this-4" class="hljs language-javascript">gem 'searchkick', '3.1.3' # For Elasticsearch 5.x
</code></pre>
</div>
</div>
Once the gem has been added to your Gemfile, run <span class="inline-code"><pre><code>bundle install</code></pre></span>.
Any model that you will want to be searchable with Elasticsearch will need to be configured to do so by adding the <span class="inline-code"><pre><code>searchkick</code></pre></span> keyword to it.
For example, our demo app has a User model that looks something like this:
<div class="code-snippet-container">
<a fs-copyclip-element="click-5" href="#" class="btn w-button code-copy-button" title="Copy">
<img class="copy-image" src="https://global-uploads.webflow.com/63c81e4decde60c281417feb/6483934eeefb356710a1d2e9_icon-copy.svg" loading="lazy" alt="">
<img class="copied-image" src="https://assets-global.website-files.com/63c81e4decde60c281417feb/64839e207c2860eb9e6aa572_icon-copied.svg" loading="lazy" alt="">
</a>
<div class="code-snippet">
<pre><code fs-codehighlight-element="code" fs-copyclip-element="copy-this-5" class="hljs language-javascript">class User < ApplicationRecord
searchkick
end</code></pre>
</div>
</div>
Adding the searchkick keyword makes our User model searchable with Searchkick.
Searchkick provides a number of reasonable settings out of the box, but you can also pass in a hash of settings if you want to override the defaults. The hash keys generally correspond to the official Create Indices API. For example, this will allow you to create an index with 0 replicas:
<div class="code-snippet-container">
<a fs-copyclip-element="click-6" href="#" class="btn w-button code-copy-button" title="Copy">
<img class="copy-image" src="https://global-uploads.webflow.com/63c81e4decde60c281417feb/6483934eeefb356710a1d2e9_icon-copy.svg" loading="lazy" alt="">
<img class="copied-image" src="https://assets-global.website-files.com/63c81e4decde60c281417feb/64839e207c2860eb9e6aa572_icon-copied.svg" loading="lazy" alt="">
</a>
<div class="code-snippet">
<pre><code fs-codehighlight-element="code" fs-copyclip-element="copy-this-6" class="hljs language-javascript">class User < ApplicationRecord
searchkick settings: { number_of_replicas: 0 }
end</code></pre>
</div>
</div>
If you have questions about shards and how many is enough, check out our Shard Primer and our documentation on Capacity Planning.
You will need to set up a route to handle searching. The easiest way to do this with Searchkick is to have a search route per model. This involves updating your models’ corresponding controller, and defining routes in <span class="inline-code"><pre><code>config/routes.rb</code></pre></span>. You’ll also need to have some views that handle rendering the results, and a form that posts data to the controller(s). Take a look at how we implemented this in our demo app for some examples of how this is done:
In our example Rails app, we have one model, <span class="inline-code"><pre><code>User</code></pre></span>, with <span class="inline-code"><pre><code>searchkick</code></pre></span>. It looks something like this:
<div class="code-snippet-container">
<a fs-copyclip-element="click-7" href="#" class="btn w-button code-copy-button" title="Copy">
<img class="copy-image" src="https://global-uploads.webflow.com/63c81e4decde60c281417feb/6483934eeefb356710a1d2e9_icon-copy.svg" loading="lazy" alt="">
<img class="copied-image" src="https://assets-global.website-files.com/63c81e4decde60c281417feb/64839e207c2860eb9e6aa572_icon-copied.svg" loading="lazy" alt="">
</a>
<div class="code-snippet">
<pre><code fs-codehighlight-element="code" fs-copyclip-element="copy-this-7" class="hljs language-javascript">class User < ApplicationRecord
searchkick
end</code></pre>
</div>
</div>
To implement search, we updated the file <span class="inline-code"><pre><code>app/controllers/users_controllers.rb</code></pre></span> and added this code:
<div class="code-snippet-container">
<a fs-copyclip-element="click-8" href="#" class="btn w-button code-copy-button" title="Copy">
<img class="copy-image" src="https://global-uploads.webflow.com/63c81e4decde60c281417feb/6483934eeefb356710a1d2e9_icon-copy.svg" loading="lazy" alt="">
<img class="copied-image" src="https://assets-global.website-files.com/63c81e4decde60c281417feb/64839e207c2860eb9e6aa572_icon-copied.svg" loading="lazy" alt="">
</a>
<div class="code-snippet">
<pre><code fs-codehighlight-element="code" fs-copyclip-element="copy-this-8" class="hljs language-javascript">class UsersController< ApplicationController
#... a bunch of controller actions, removed for brevity
def search
@results = User.search(params[:q])
end
#... more controller actions removed for brevity
end</code></pre>
</div>
</div>
We then created a route in the <span class="inline-code"><pre><code>config/routes.rb</code></pre></span> file:
<div class="code-snippet-container">
<a fs-copyclip-element="click-9" href="#" class="btn w-button code-copy-button" title="Copy">
<img class="copy-image" src="https://global-uploads.webflow.com/63c81e4decde60c281417feb/6483934eeefb356710a1d2e9_icon-copy.svg" loading="lazy" alt="">
<img class="copied-image" src="https://assets-global.website-files.com/63c81e4decde60c281417feb/64839e207c2860eb9e6aa572_icon-copied.svg" loading="lazy" alt="">
</a>
<div class="code-snippet">
<pre><code fs-codehighlight-element="code" fs-copyclip-element="copy-this-9" class="hljs language-javascript">Rails.application.routes.draw do
resources :users do
collection do
post :search # creates a route called users_search
end
end
end</code></pre>
</div>
</div>
Next, we need to have some views to render the data we get back from Elasticsearch. The <span class="inline-code"><pre><code>search</code></pre></span> controller action will be rendered by creating a file called <span class="inline-code"><pre><code>app/views/users/search.html.erb</code></pre></span> and adding:
<div class="code-snippet-container">
<a fs-copyclip-element="click-10" href="#" class="btn w-button code-copy-button" title="Copy">
<img class="copy-image" src="https://global-uploads.webflow.com/63c81e4decde60c281417feb/6483934eeefb356710a1d2e9_icon-copy.svg" loading="lazy" alt="">
<img class="copied-image" src="https://assets-global.website-files.com/63c81e4decde60c281417feb/64839e207c2860eb9e6aa572_icon-copied.svg" loading="lazy" alt="">
</a>
<div class="code-snippet">
<pre><code fs-codehighlight-element="code" fs-copyclip-element="copy-this-10" class="hljs language-javascript">Search Results
<% if @results.present? %>
<%= render partial: 'search_result', collection: @results, as: :result %>
<% else %>
Nothing here, chief!
<% end %>
</code></pre>
</div>
</div>
This way if there are no results to show, we simply put a banner indicating as such. If there are results to display, we will iterate over the collection (assigning each one to a local variable called <span class="inline-code"><pre><code>result</code></pre></span>), and passing it off to a partial. We also created a file for a partial called <span class="inline-code"><pre><code>app/views/users/_search_result.html.erb</code></pre></span> and added:
<div class="code-snippet-container">
<a fs-copyclip-element="click-11" href="#" class="btn w-button code-copy-button" title="Copy">
<img class="copy-image" src="https://global-uploads.webflow.com/63c81e4decde60c281417feb/6483934eeefb356710a1d2e9_icon-copy.svg" loading="lazy" alt="">
<img class="copied-image" src="https://assets-global.website-files.com/63c81e4decde60c281417feb/64839e207c2860eb9e6aa572_icon-copied.svg" loading="lazy" alt="">
</a>
<div class="code-snippet">
<pre><code fs-codehighlight-element="code" fs-copyclip-element="copy-this-11" class="hljs language-javascript">
<%= link_to "#{result.first_name} #{result.last_name} <#{result.email}>", user_path(result) %>
<%= result.company %>
<%= result.company_description %>
</code></pre>
</div>
</div>
This partial simply renders a search result using some of the data of the matching ActiveRecord objects.
At this point, the <span class="inline-code"><pre><code>User</code></pre></span> model is configured for searching in Elasticsearch, and has routes for sending a query to Elasticsearch. The next step is to render a form so that a user can actually use this feature. This is possible with a basic <span class="inline-code"><pre><code>form_with</code></pre></span> helper.
In this demo app, we added this to the navigation bar:
<div class="code-snippet-container">
<a fs-copyclip-element="click-12" href="#" class="btn w-button code-copy-button" title="Copy">
<img class="copy-image" src="https://global-uploads.webflow.com/63c81e4decde60c281417feb/6483934eeefb356710a1d2e9_icon-copy.svg" loading="lazy" alt="">
<img class="copied-image" src="https://assets-global.website-files.com/63c81e4decde60c281417feb/64839e207c2860eb9e6aa572_icon-copied.svg" loading="lazy" alt="">
</a>
<div class="code-snippet">
<pre><code fs-codehighlight-element="code" fs-copyclip-element="copy-this-12" class="hljs language-javascript"><%= form_with(url: "/search", method: "post", class: 'form-inline my-2 my-lg-0', local: true) do %>
<%= text_field_tag(:q, nil, class: "form-control mr-sm-2", placeholder: "Search") %>
<%= button_tag("Search", class: "btn btn-outline-info my-2 my-sm-0", name: nil) %>
<% end %></code></pre>
</div>
</div>
This code renders a form that looks like this:

Please note that these classes use Bootstrap, which may not be in use with your application. The ERB scaffold should be easily adapted to your purposes.
We’re close to finishing up. We just need to tell the app where the Bonsai cluster is located, then push our data into that cluster.
Searchkick looks for an environment variable called <span class="inline-code"><pre><code>ELASTICSEARCH_URL</code></pre></span>, and if it doesn’t find it, it uses <span class="inline-code"><pre><code>localhost:9200</code></pre></span>. This is a problem because your Bonsai cluster is not running on a localhost. We need to make sure Searchkick is pointed to the correct URL.
Bonsai does offer a gem, bonsai-searchkick, which populates the necessary environment variable automatically. If you're using this gem, then all you need to do is ensure that there is an environment variable called <span class="inline-code"><pre><code>BONSAI_URL</code></pre></span> set in your application environment that points at your Bonsai cluster URL.
Heroku users will have this already, and can skip to the next step. Other users will need to make sure this environment variable is manually set in their application environment. If you have access to the host, you can run this command in your command line:
<div class="code-snippet-container">
<a fs-copyclip-element="click-13" href="#" class="btn w-button code-copy-button" title="Copy">
<img class="copy-image" src="https://global-uploads.webflow.com/63c81e4decde60c281417feb/6483934eeefb356710a1d2e9_icon-copy.svg" loading="lazy" alt="">
<img class="copied-image" src="https://assets-global.website-files.com/63c81e4decde60c281417feb/64839e207c2860eb9e6aa572_icon-copied.svg" loading="lazy" alt="">
</a>
<div class="code-snippet">
<pre><code fs-codehighlight-element="code" fs-copyclip-element="copy-this-13" class="hljs language-javascript"># Substitute with your cluster URL, obviously:
export BONSAI_URL="https://abcd123:efg456@my-cluster-123456.us-west-2.bonsaisearch.net:443"</code></pre>
</div>
</div>
You will only need to write an initializer if:
If you need to do this, then you can create a file called <span class="inline-code"><pre><code>config/initializers/elasticsearch.rb</code></pre></span>. Inside this file, you will want to put something like this:
<div class="code-snippet-container">
<a fs-copyclip-element="click-14" href="#" class="btn w-button code-copy-button" title="Copy">
<img class="copy-image" src="https://global-uploads.webflow.com/63c81e4decde60c281417feb/6483934eeefb356710a1d2e9_icon-copy.svg" loading="lazy" alt="">
<img class="copied-image" src="https://assets-global.website-files.com/63c81e4decde60c281417feb/64839e207c2860eb9e6aa572_icon-copied.svg" loading="lazy" alt="">
</a>
<div class="code-snippet">
<pre><code fs-codehighlight-element="code" fs-copyclip-element="copy-this-14" class="hljs language-javascript"># Assuming you can set the BONSAI_URL variable:
ENV["ELASTICSEARCH_URL"] = ENV['BONSAI_URL']</code></pre>
</div>
</div>
If you’re one of the few who can’t set the <span class="inline-code"><pre><code>BONSAI_URL</code></pre></span> variable, then you’ll need to do something like this:
<div class="code-snippet-container">
<a fs-copyclip-element="click-15" href="#" class="btn w-button code-copy-button" title="Copy">
<img class="copy-image" src="https://global-uploads.webflow.com/63c81e4decde60c281417feb/6483934eeefb356710a1d2e9_icon-copy.svg" loading="lazy" alt="">
<img class="copied-image" src="https://assets-global.website-files.com/63c81e4decde60c281417feb/64839e207c2860eb9e6aa572_icon-copied.svg" loading="lazy" alt="">
</a>
<div class="code-snippet">
<pre><code fs-codehighlight-element="code" fs-copyclip-element="copy-this-15" class="hljs language-javascript"># Use your personal URL, not this made-up one:
ENV["ELASTICSEARCH_URL"] = "https://abcd123:efg456@my-cluster-123456.us-west-2.bonsaisearch.net:443"</code></pre>
</div>
</div>
If you’re wondering why we prefer to use an environment variable instead of the URL, it’s simply a best practice. The cluster URL is considered sensitive information, in that anyone with the fully-qualified URL is going to have full read/write access to the cluster.
So if you have it in an initializer and check it into source control, that creates an attack vector. Many people have been burned by committing sensitive URLs, keys, passwords, etc to git, and it’s best to avoid it.
Additionally, if you ever need to change your cluster URL, updating the initializer will require another pass through CI and a deployment. Whereas you could otherwise just change the environment variable and restart Rails. Environment variables are simply the better way to go.
Now that the app has everything it needs to query the cluster and render the results, we need to push data into the cluster. There are a few ways to do this.
One method is to open up a Rails console and run <span class="inline-code"><pre><code>.reindex</code></pre></span>. So if you want to reindex a model called <span class="inline-code"><pre><code>User</code></pre></span>, you would run <span class="inline-code"><pre><code>User.index</code></pre></span>.
Another method is to use Rake tasks from the command line. If you wanted to reindex that same <span class="inline-code"><pre><code>User</code></pre></span> model, you could run: <span class="inline-code"><pre><code>bundle exec rake searchkick:reindex CLASS=User</code></pre></span>. Alternatively, if you have multiple Searchkick-enabled models, you could run <span class="inline-code"><pre><code>rake searchkick:reindex:all</code></pre></span>.
Regardless of how you do it, Searchkick will create an index named after the ActiveRecord table of the model, the environment, and a timestamp. So reindexing the <span class="inline-code"><pre><code>User</code></pre></span> model in a development environment might result in an index called <span class="inline-code"><pre><code>users_development_20191029111649033</code></pre></span>. This allows Searchkick to provide zero-downtime updates to settings and mappings.
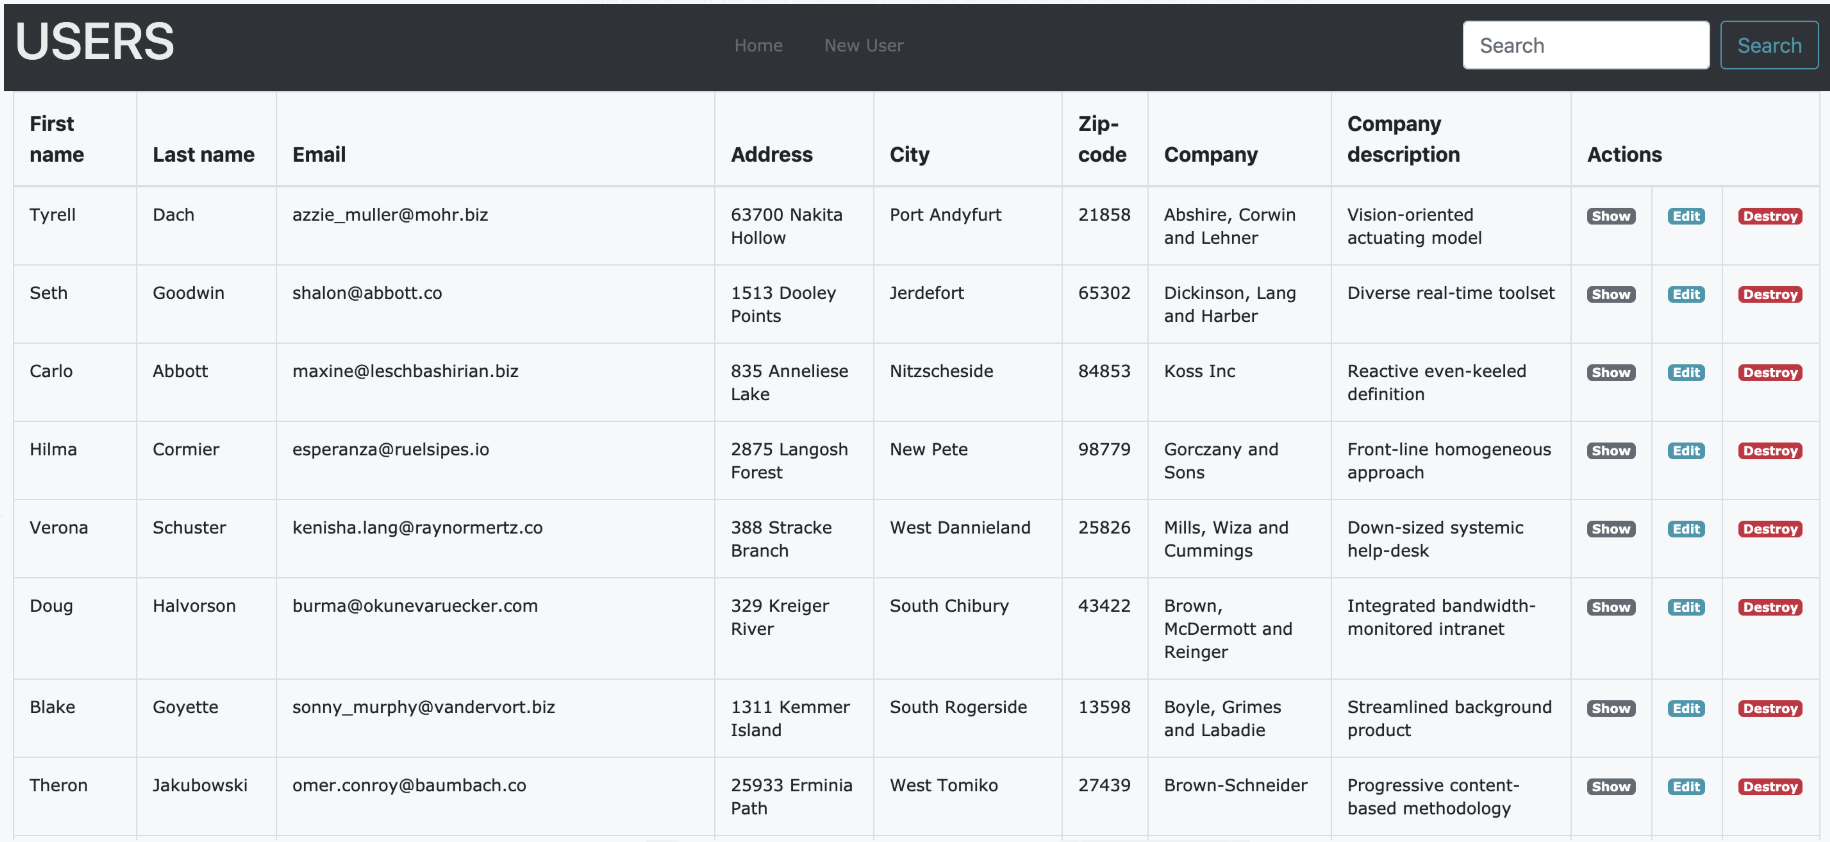
At this point you should have all of the pieces you need to search your data using Searchkick. In our demo app, we have this simple list of users:
This search box is rendered by a form that will pass the query to the <span class="inline-code"><pre><code>UsersController#search</code></pre></span> action, via the route set up in <span class="inline-code"><pre><code>config/routes.rb</code></pre></span>:

This query will reach the <span class="inline-code"><pre><code>UsersController#search</code></pre></span> action, where it will be passed to Searchkick, which queries Elasticsearch. Elasticsearch will search the <span class="inline-code"><pre><code>users_development_20191029111649033</code></pre></span> index, and return any hits to a class variable called <span class="inline-code"><pre><code>@results</code></pre></span>.
The UsersController will then ensure the appropriate views are rendered. Each result will be rendered by the partial <span class="inline-code"><pre><code>app/views/users/_search_result.html.erb</code></pre></span>. It looks something like this:
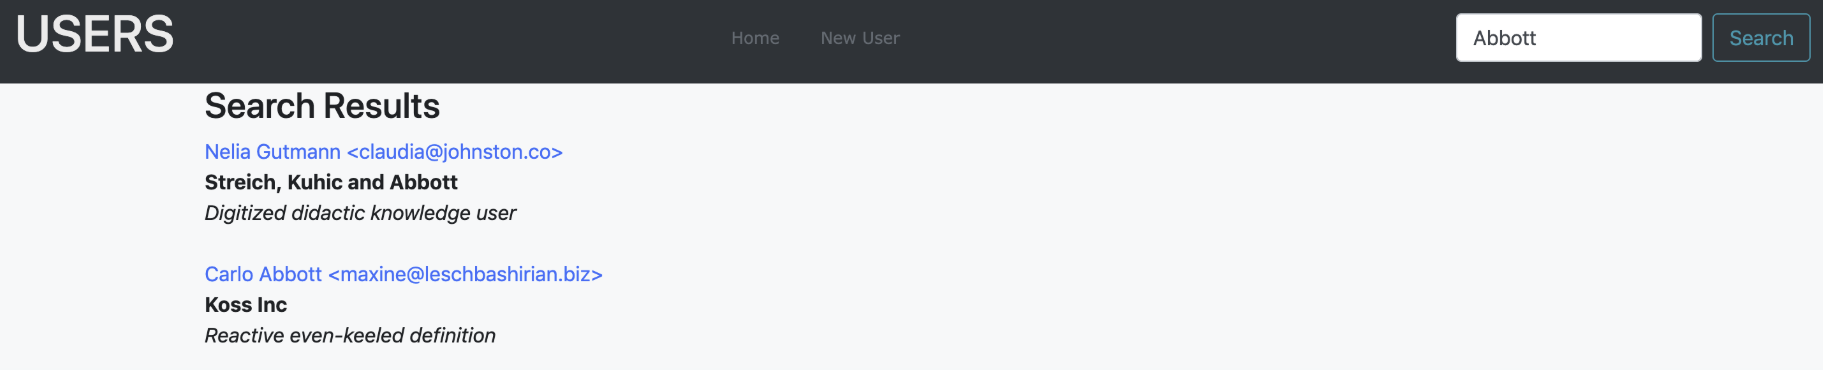
Congratulations! You have implemented Searchkick in Rails!
This documentation demonstrated how to quickly get Elasticsearch added to a basic Rails application. We installed the Searchkick gem, added it to a model, set up the search route, and created the views and partials needed to render the results. Then we set up the connection to Elasticsearch and pushed the data into the cluster. Finally, we were able to search that data through our app.
Hopefully this was enough to get you up and running with Searchkick. This documentation is not exhaustive, and there are a lot of really cool features that Searchkick offers. There are other additional changes and customizations that can be implemented to make search more accurate and resilient.
You can find information on additional subjects in the section below. And if you have any ideas or requests for additional content, please don’t hesitate to let us know!
